Step-by-Step Configurations for Messenger Chatbot Module
Phase – Facebook App Creation
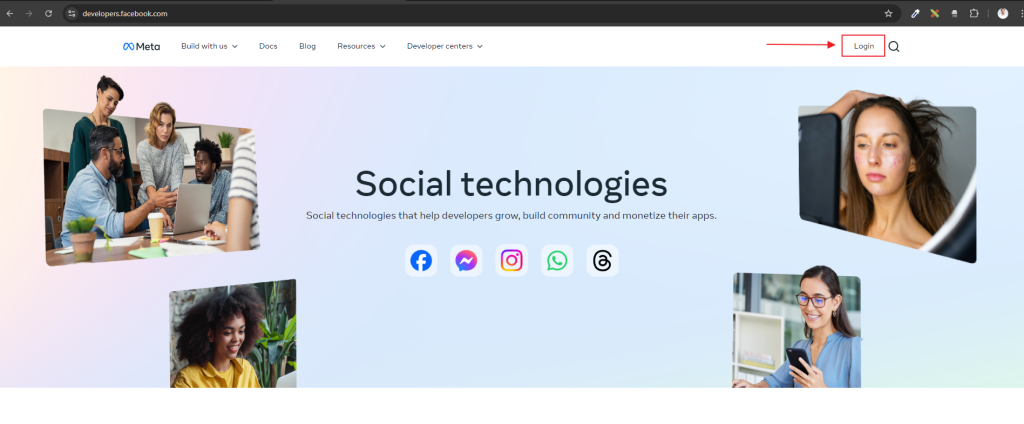
1. Go to https://developers.facebook.com/ from your web browser and Click on Login link.
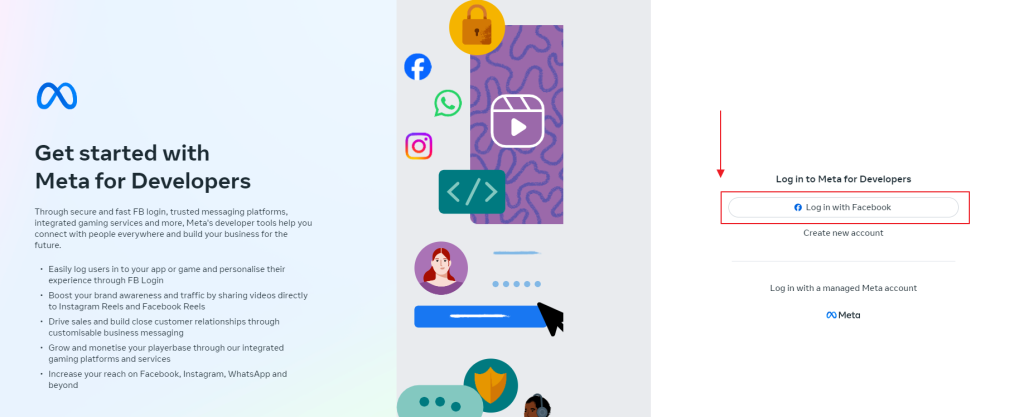
2. Click on “Log in with Facebook” button, then login with your facebook account by providing a valid User ID and Password.
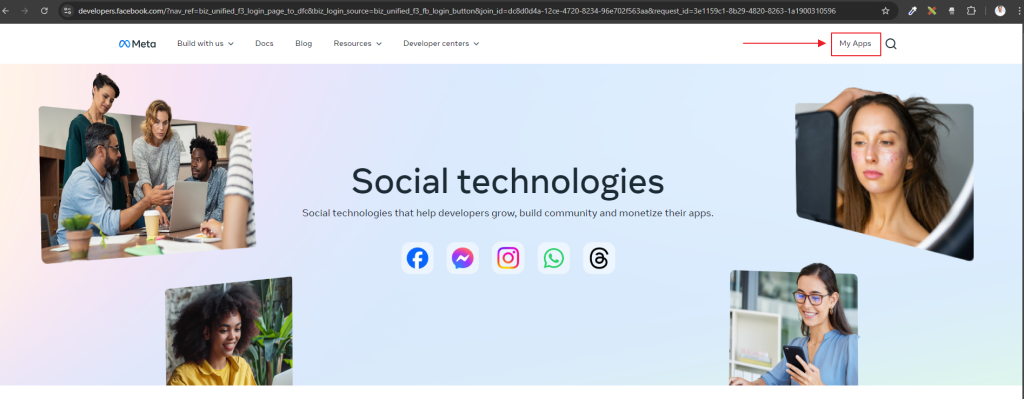
3. You will get a page like below, click on “My Apps” link.
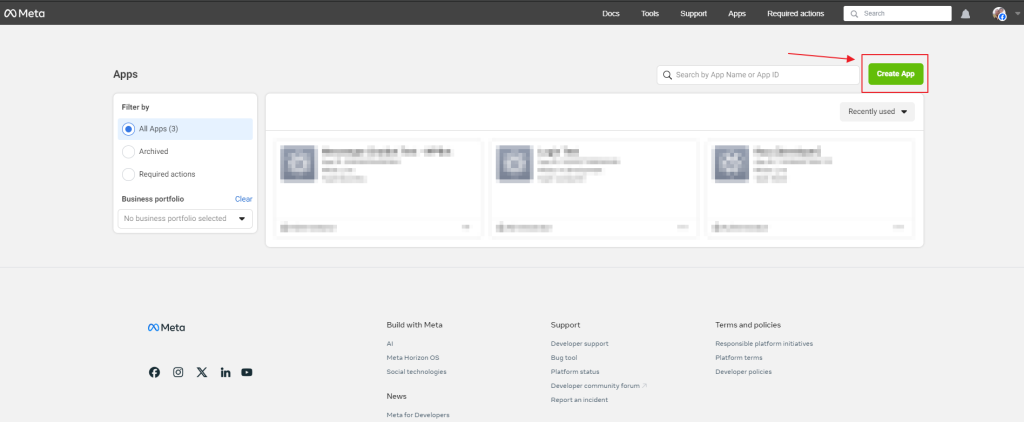
4. Now you need to create a new Facebook App. Click on “Create App” button to proceed.
5. While you are at “Create an App” screen, “Business” will appear in left timeline, then click on “Next” button. You will be redirected to “Use Cases” field.

6. Select “Others” from “Use Cases” phase, then click on “Next”.
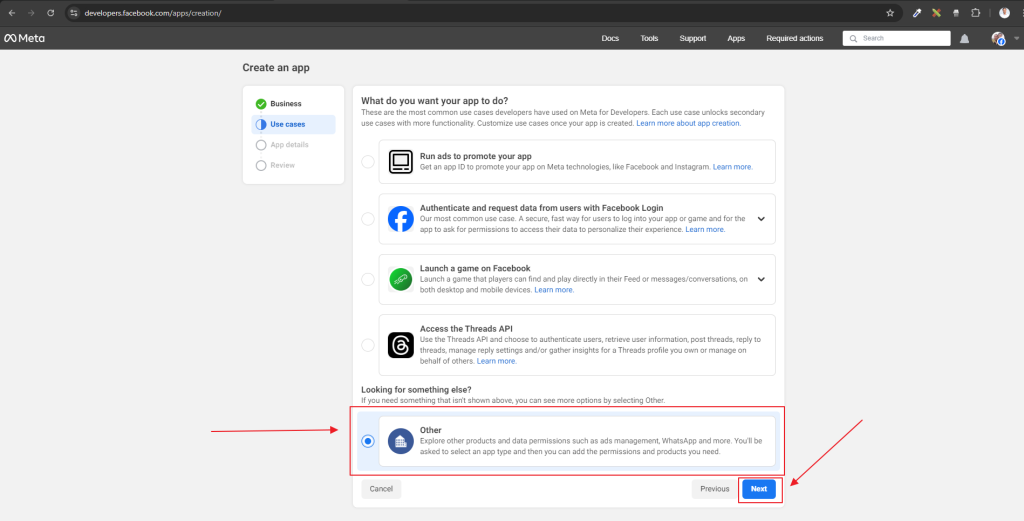
7. From “Type” selection, select “Business” and click on “Next”.

8. In “App Details” screen, put your app name inside “Add an app name” field. Make sure that the App Name is exactly the same as the Page name for which you are creating the app. Then put your contact email address inside “App contact email” field. Next click on “Create App” button.

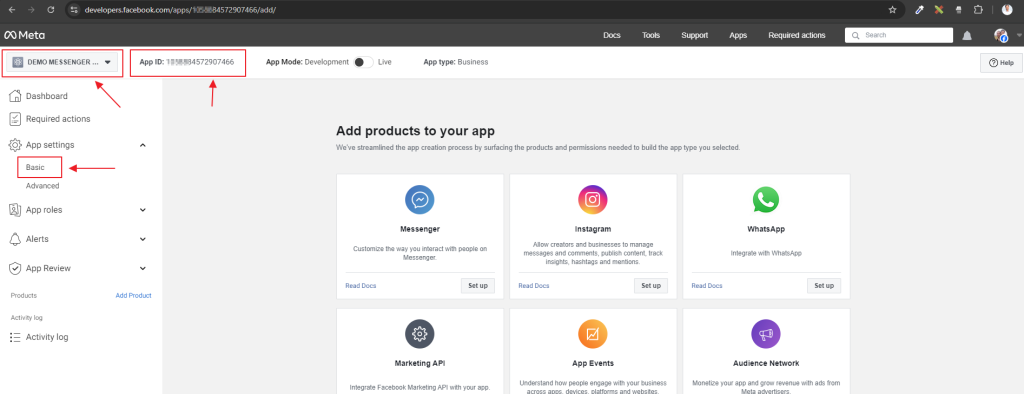
Your new Facebook App will be created and you will get an APP ID like below. Click on “App Settings –> Basic” to set basic configurations for your newly created app.
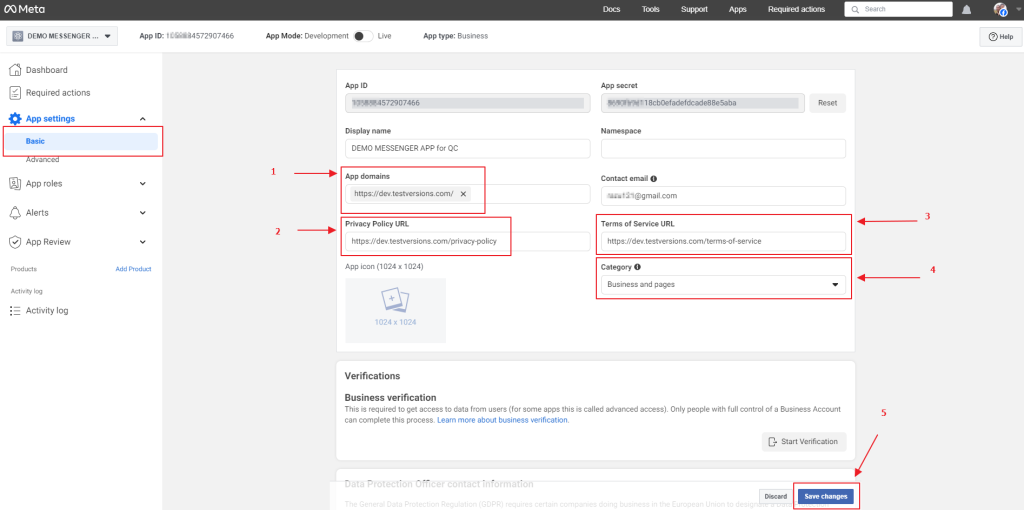
9. Under “Basic Settings” – set your “App Domain(s)”, “Privacy Policy URL”, “Terms of Service URL”. Then pick a suitable “Category”. Then click on “Save Settings” buttons.
At this point, fields and buttons will look like below –
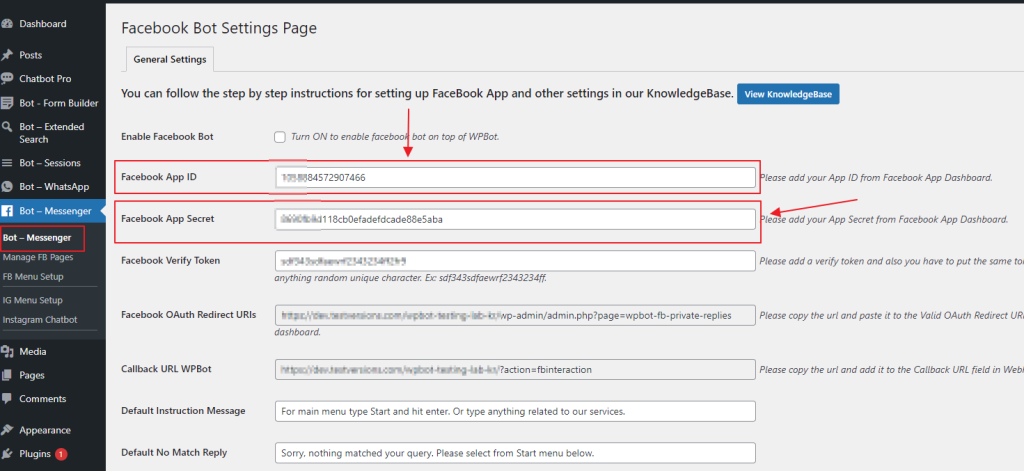
10. From basic settings you will find your “App ID” and “App Secret”. Copy these data, you will require to put these in “Facebook App ID” and “Facebook App Secret” of Messenger Module Configurations.
Copy the App ID & App Secret and add it to the “WP Dashboard –> Bot – Messenger” page.

Phase – Adding and Configuring products in the App.
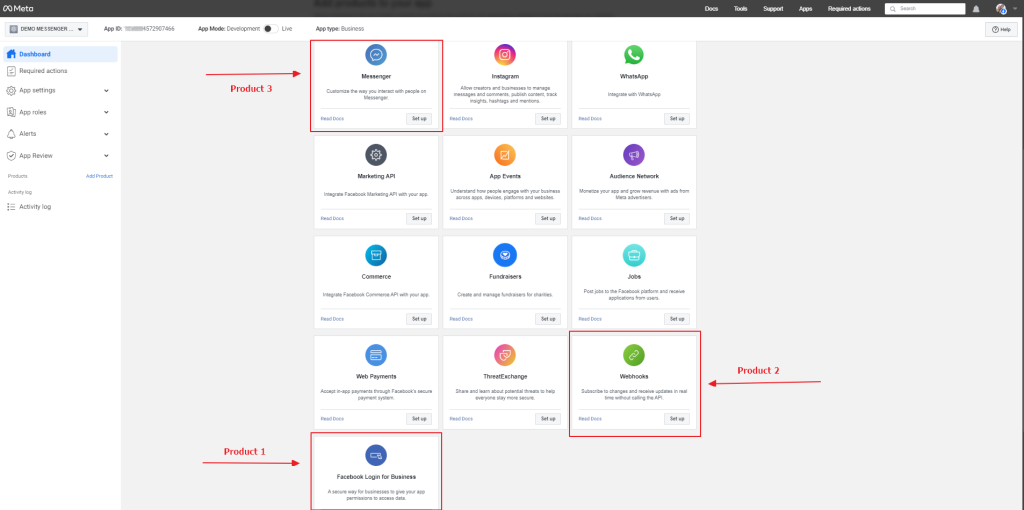
You will need to add “Facebook Login”, “Messenger” and “Webhooks” products with your created app.
Product 1 – “Facebook Login for Business”
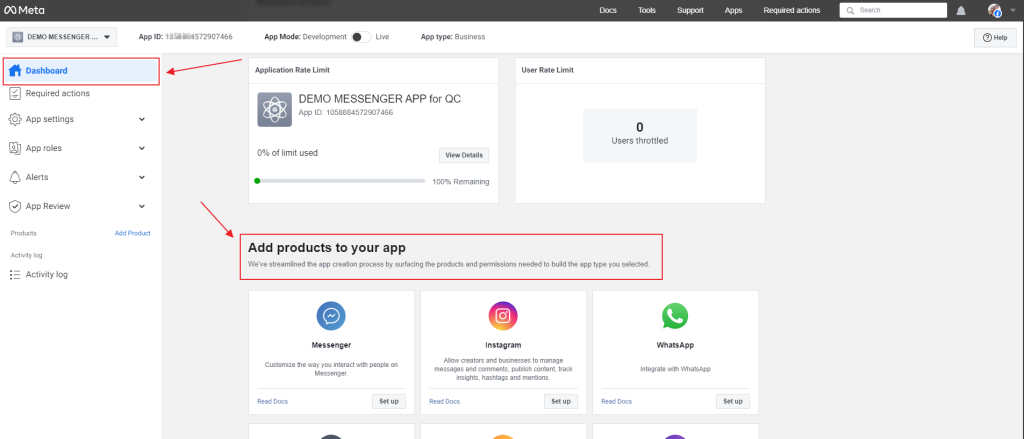
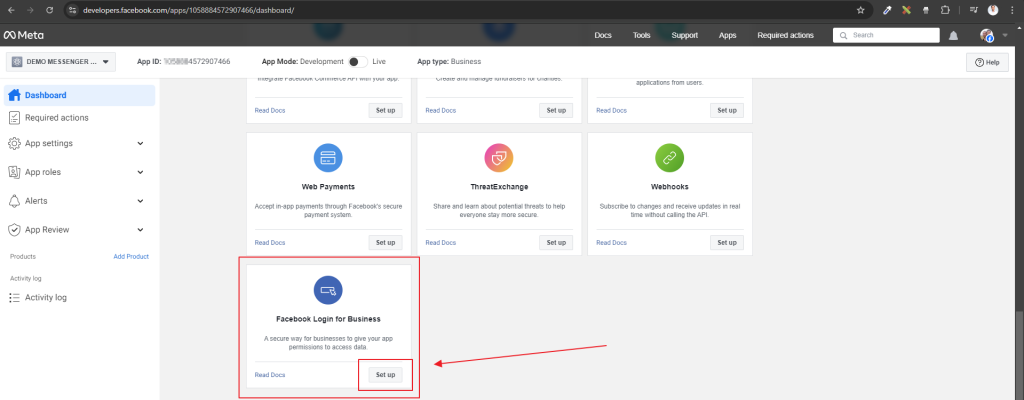
11. Click on “Dashboard” menu from the left side, navigate to “Add products to your app” section. Then find “Facebook Login for Business”.
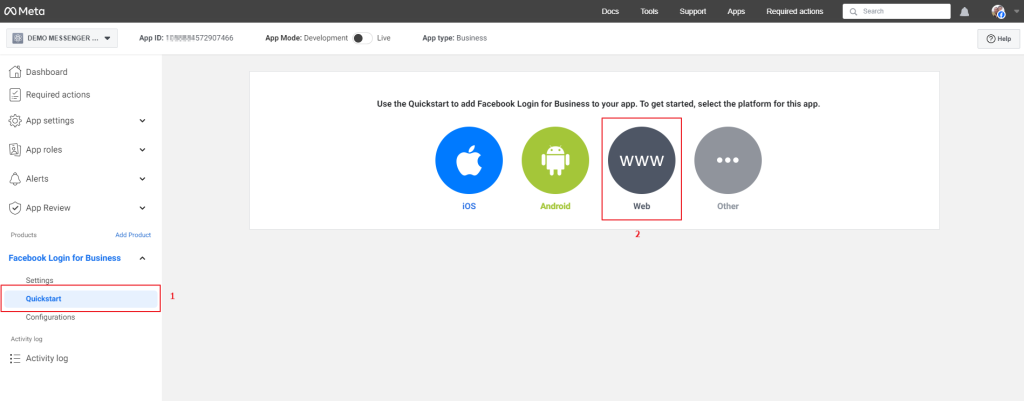
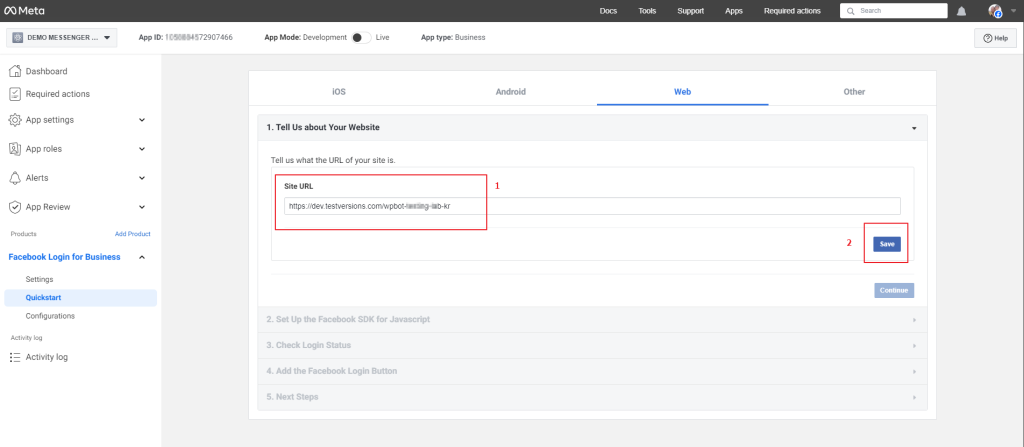
a) Click on “Facebook Login for Business –> Quick Start” menu from the left side panel/meu-bar. Then click on WWW.
Next set your SITE URL in “Tell us what the URL of your site is.” Section and click SAVE button.
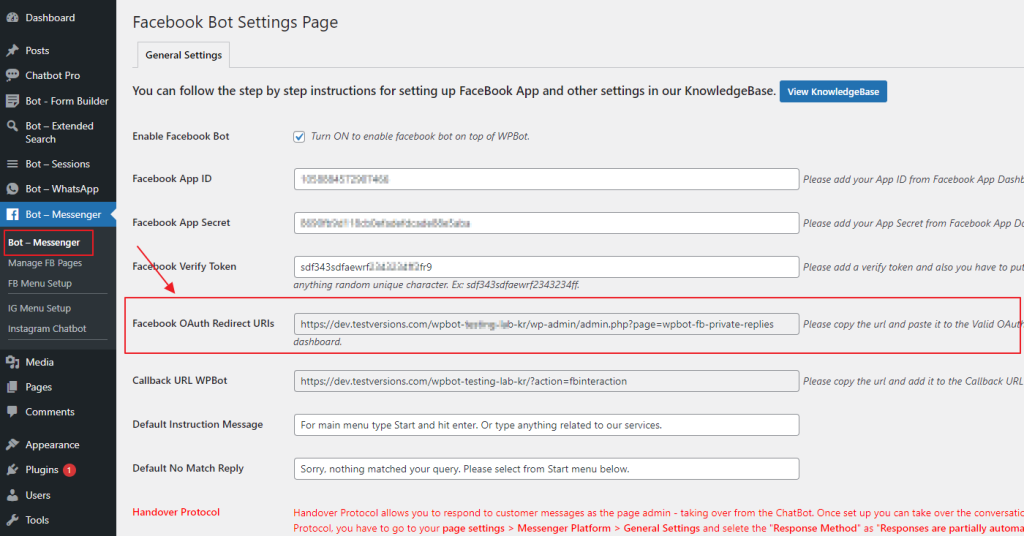
b) Click on “Facebook Login for Business –> Settings” menu from the left side panel. Add a Valid OAuth Redirect URIs. You need to copy the redirect URL from “WP Dashboard –> Bot – Messenger” page. As shown below.
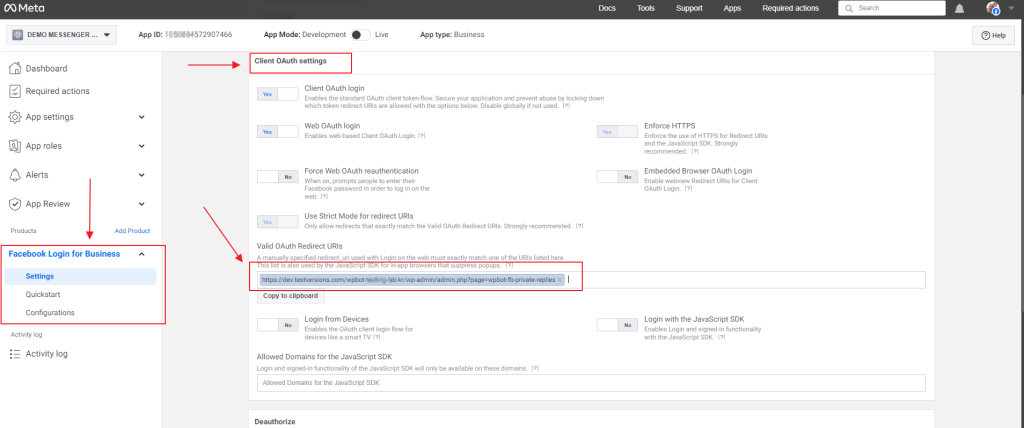
Finally click on “Save Changes” button to save your settings.
Product 2 – “Messenger”
12. You need to add Messenger product from “Dashaboard –> Add product” page. Just click on the “Setup” button for Messenger product.
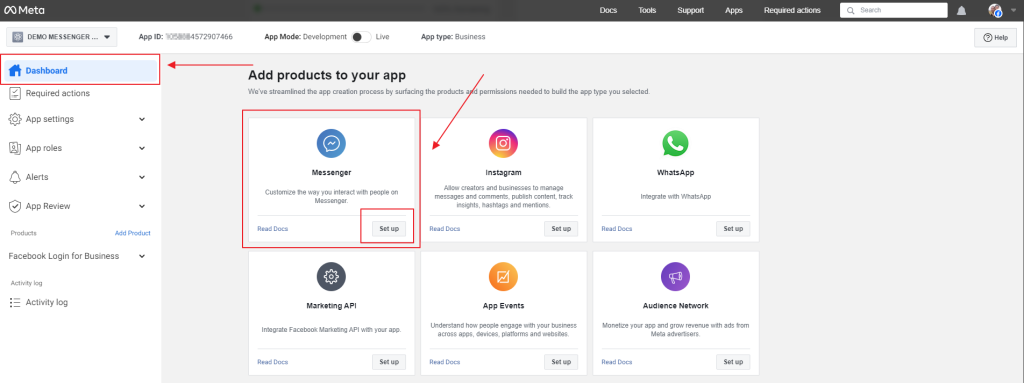
After that you have to setup the Webhook for messenger.
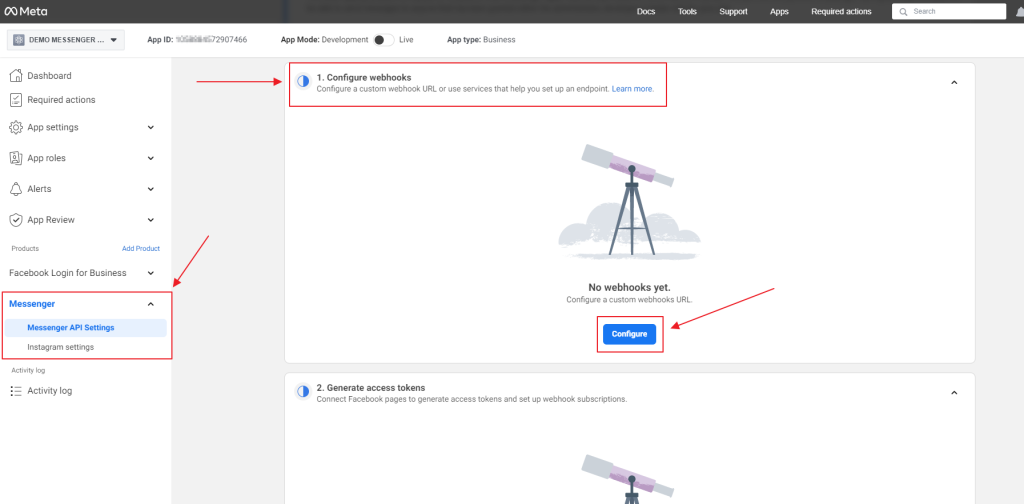
a) Go to “Messenger –> Messenger API settings” from the left menu. Then navigate to “Configure webhooks” section. Click on “Configure” button.
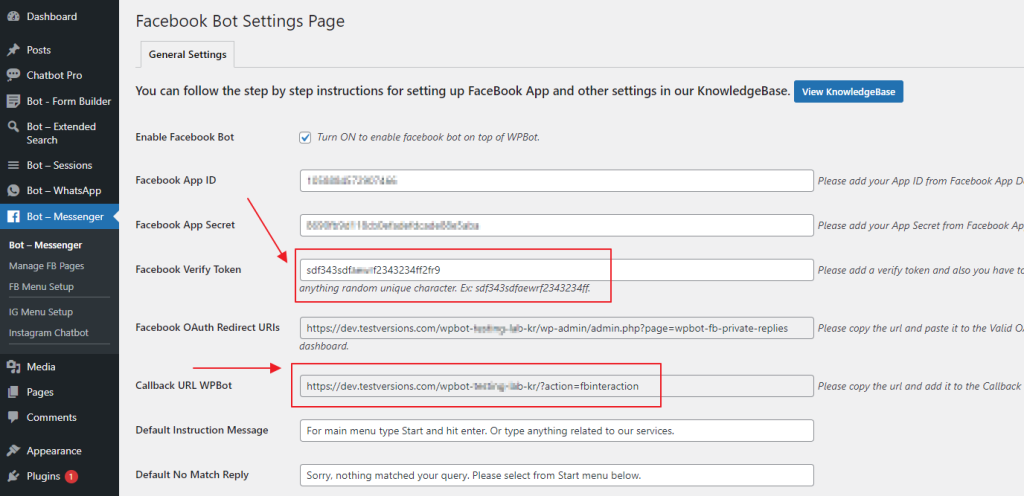
b) Copy “Callback URL WPBot” and “Facebook Verify Token” from “WP Dashboard –> Bot – Messenger” page. Please note, verify token can be any random string. Then paste inside messenger product settings like below –
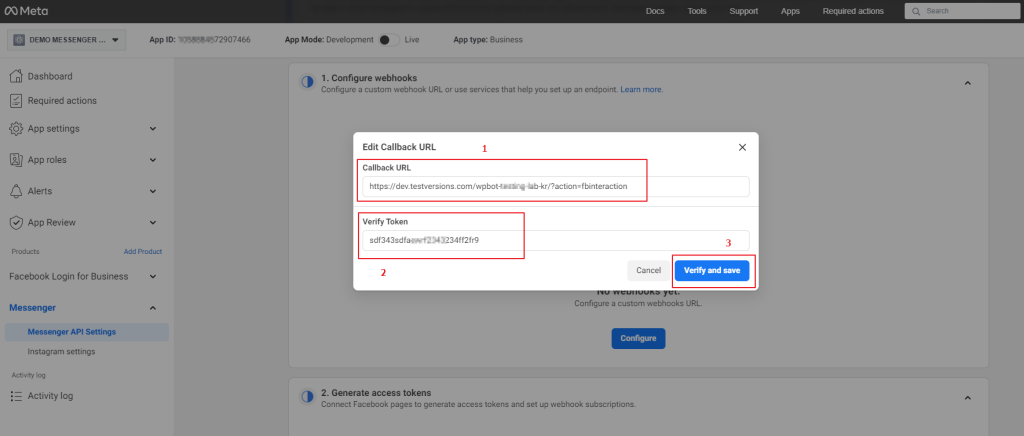
Click on “Verify and Save” button to save the settings.
Product 3 – “Webhooks”
13. You need to add Webhooks product from “Dashaboard –> Add product” page. Just click on the “Setup” button for Messenger product. [Skip this step if there is already an Webhook menu in the left side. It might be added during configuring Webhooks for Messenger.]
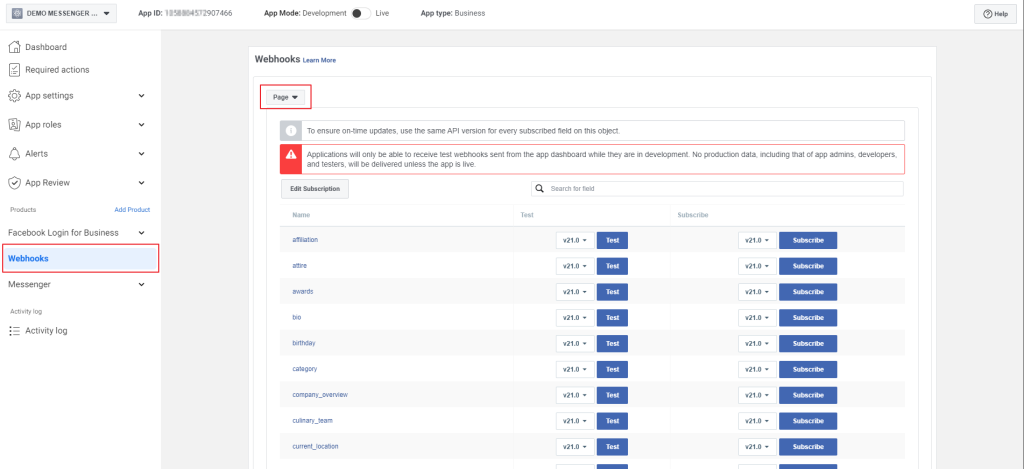
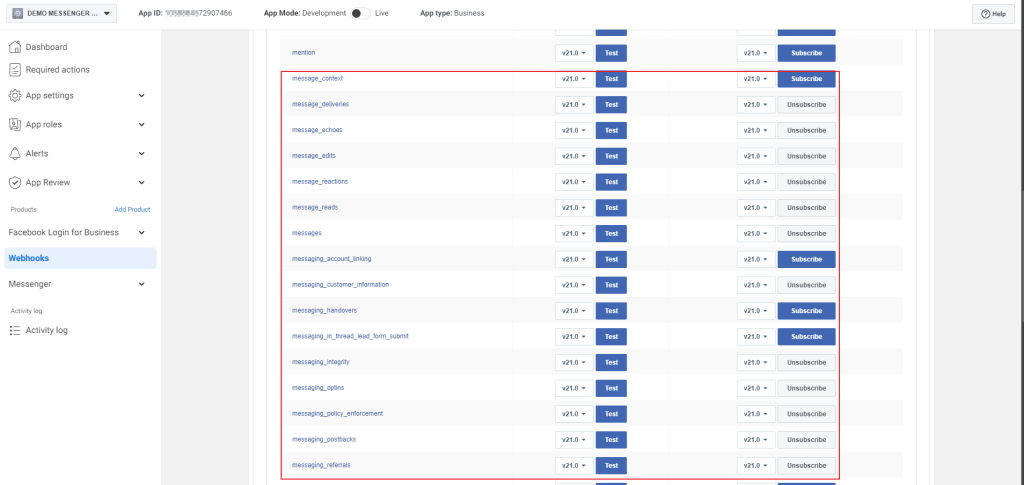
a) While selecting PAGE at the top, subscribe to all the events started with the below texts –
feed
messeges_*,
messiging_*
Page Events will look like as below after clicking on respetive subscribing buttons.

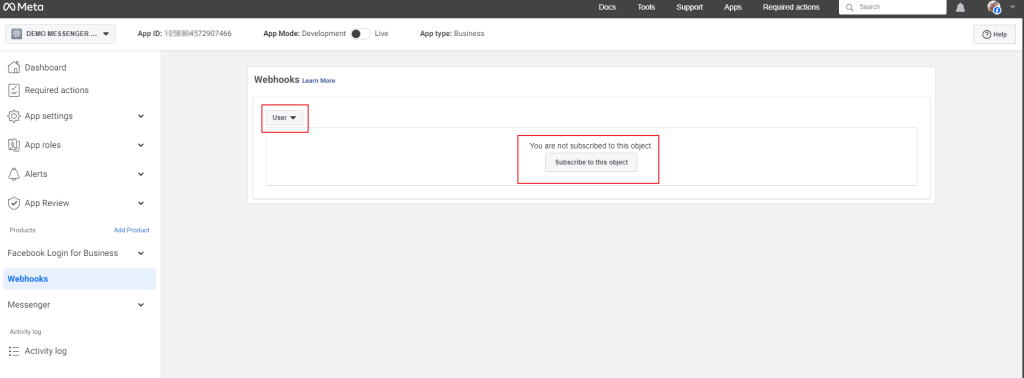
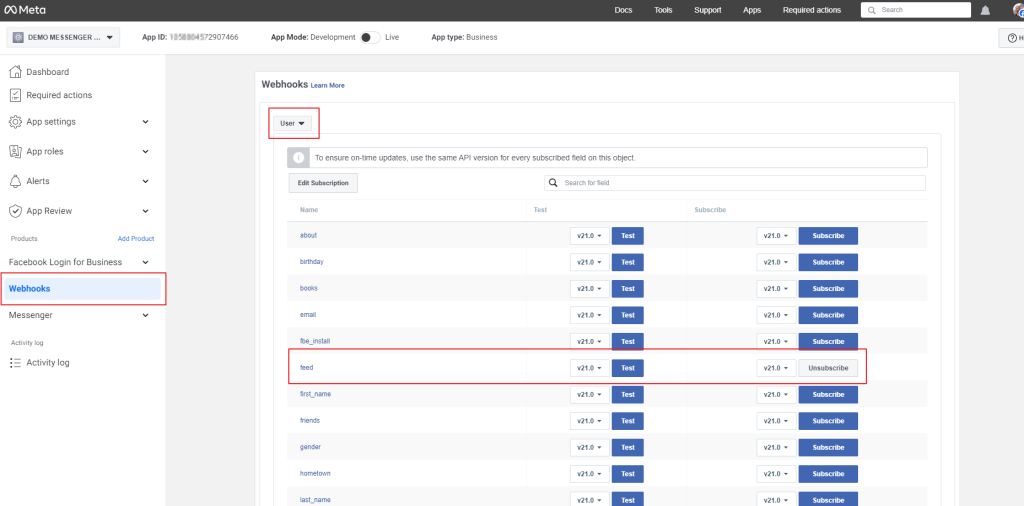
b) While selecting USER at the top, subscribe to
feed
event like shown below.

14. Now connect your facebook page with the Module as below –
Click on “Login with Facebook” button and follow the instruction from the later screens.

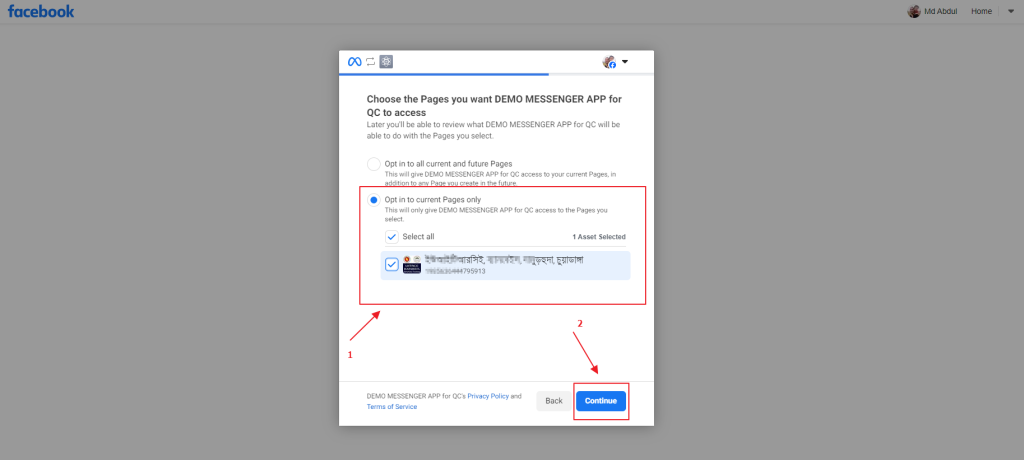
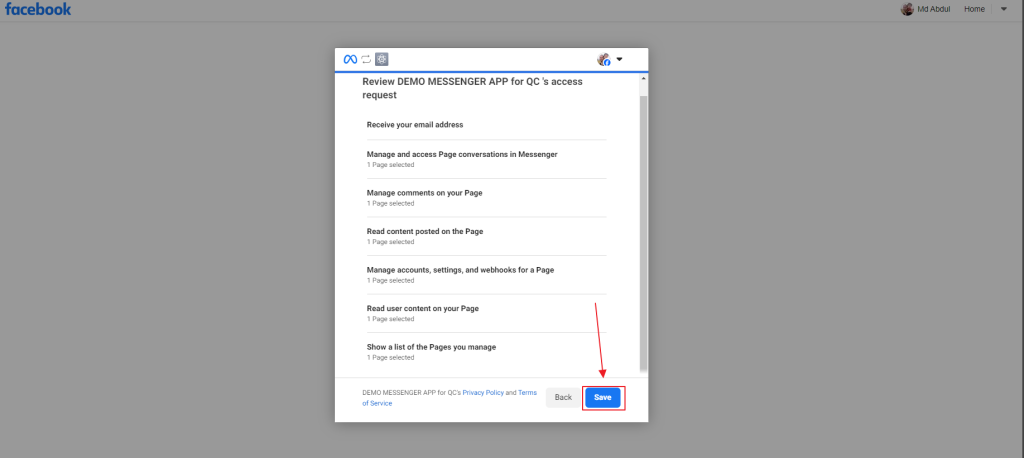

If you provide user credentials and select the app with respective page(s) properly, then your page(s) will be linked with the Module. Follow the images above for more clear ideas about linking a facebook page with the Module.
[Note: Please use the same facebook account that you used to create the App for avoiding any complexities related to page linking.]
15. Put the app in “Live Mode” to activate the created App.

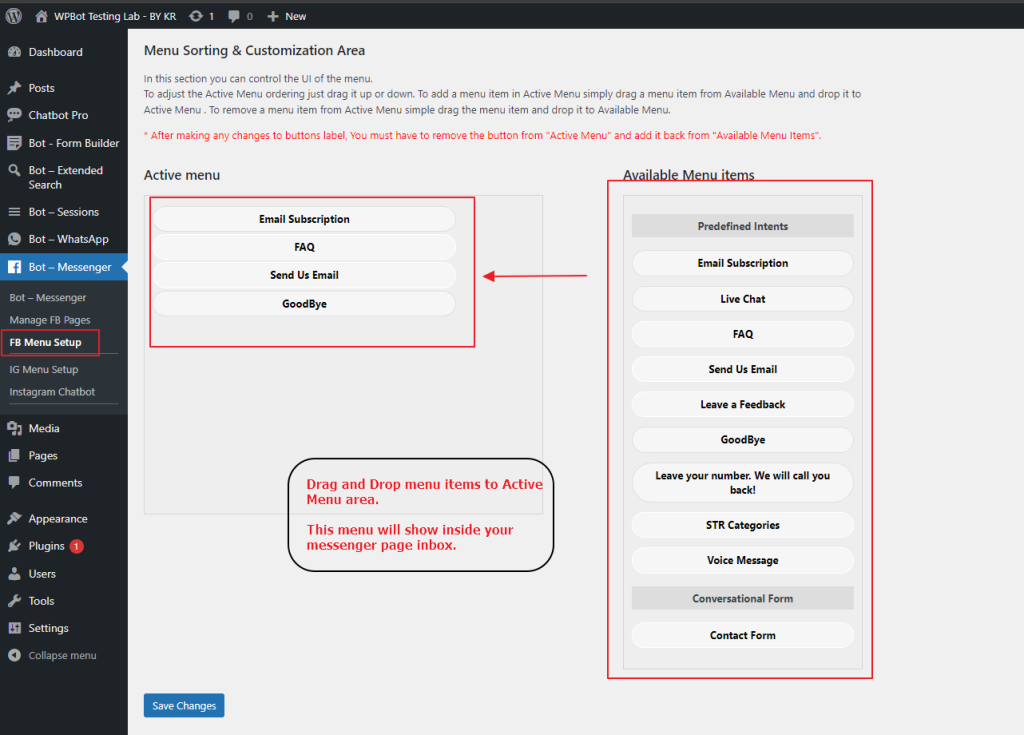
16. Add menu items to your “Active Menu” parts of “Dashaboard –> Bot – Messenger –> FB Menu Setup”
FB App Permissions
Permissions provide a way for your app to access data from Facebook.
The following permission is needed for the Facebook App to work with Chatbot.
pages_read_engagement
pages_manage_engagement
pages_manage_metadata
pages_messaging
You can learn more about the Permissions from here. https://developers.facebook.com/docs/permissions/reference/
Broadcast
The Messenger Platform’s Broadcast API allows you to broadcast a message to everyone that currently has an open conversation with your Page. The broadcast message is displayed on the Page inbox only when a user replies in a thread.
Permission
“pages_messaging” permission is needed to send broadcast.
Rate Limits
Rate limits are in place to prevent malicious behavior and poor user experiences.
The per day rate limit is equal to 200 * the number of people the business can message via Messenger.
For pages with large audiences, we recommend a send rate of 250 requests per second.
#Page Comments AUTO REPLY:
- Navigate to “Bot – Messenger –> Manage FB Pages” menu. Then select “Manage Posts Reply” link.
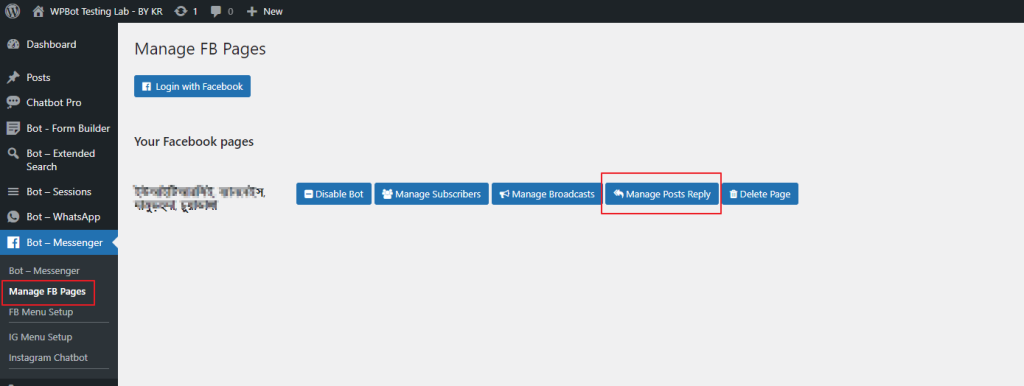
- Click on “Reload Posts” (for the 1st time only, to load all the posts. Later use this button to sync posts only).

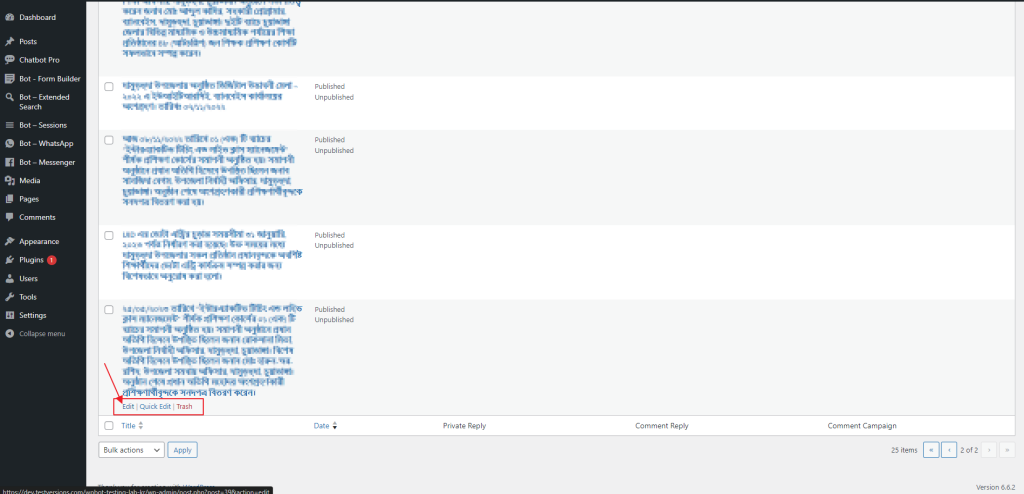
- You will get a list of the posts from your linked page/page(s).
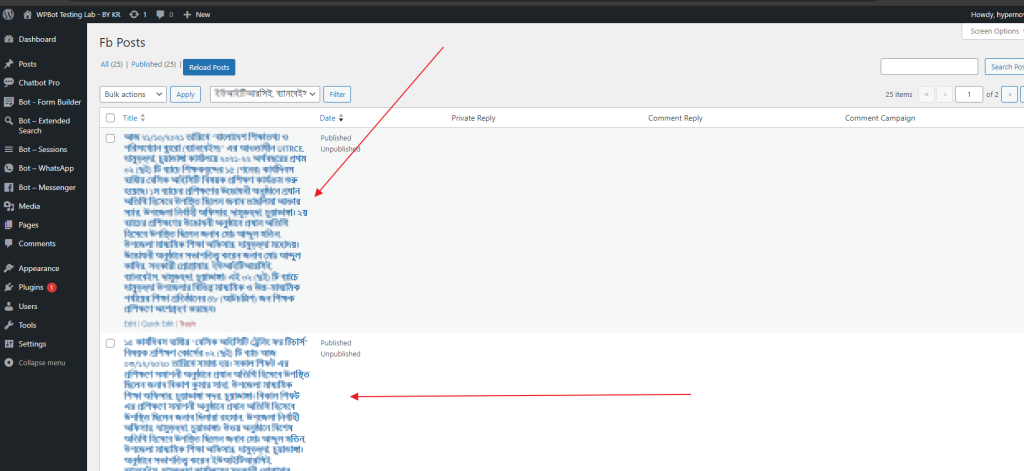
- Click on “Edit” button on any specific post, during mouseover of the post title.
- “Enable Private Reply” option if you want to reply privately to the commentor in line with comment reply.
- “Enable Comment Reply” option if you want to reply the commentor in his/her comment.
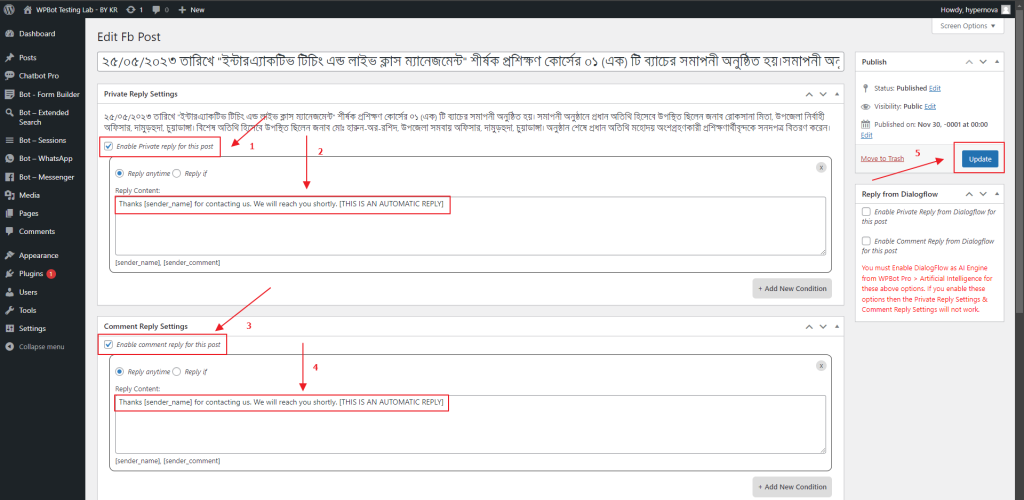
- When a user makes a reply to your post, this Module will automatically post a response as per your settings. It will look like below.

Additional points:
App Page
To associate your Facebook Page with your app. Your app’s name must be in the Page’s name, and the Page’s category must be set to App Page. This is required to enable the Handover Protocol
Thanks a lot for reading up to this point. Thanks for using QuantumCloud products.
